A guide about Dialogflow CX Webhook development (English)

An introduction to how to develop your Dialogflow CX webhooks, from the Dialogflow CX console to your laptop!
- Dialogflow CX Webhooks development
Dialogflow CX Webhooks development
Dialogflow CX Webhooks can be developed using Google Cloud functions or a REST API endpoint. Google Cloud Function function is Googles’s implementation of serverless functions available in GCP. Google recommends using Google Cloud Function functions for Dialogflow CX development.
In this post, we will implement a Dialogflow CX Agent by using Golang, protobuf and Google Cloud Functions. This project is basically a Hello World example.
This post contains materials from different resources that can be seen in the Resources section.
Prerequisites
Here you have the technologies used in this project
- Google Cloud Account - Sign up here for free
- Dialogflow API enabled - How to enable it
- gcloud CLI - Install and configure gcloud CLI
- Dialogflow CX CLI - Install and configure Dialogflow CX CLI
- Golang v1.19 or higher
- Visual Studio Code
- Dialogflow CX for Golang (Version >=1.23.0)
- ngrok
The Google Cloud Command Line Interface (gcloud CLI) is a tool for you to manage your Google Cloud serverless functions and related resources. cxcli CLI allows you to manage Dialogflow CX Agents programmatically from the command line. We will use these powerful tools to create, build, deploy and manage our Hello World Dialogflow CX agent. Let’s start!
Creating the Dialogflow CX Agent with the Console
For creating the Dialogflow CX Agent, you will need to go to the Dialogflow CX Console and create an agent. Once you have your agent created, you will see the design view:
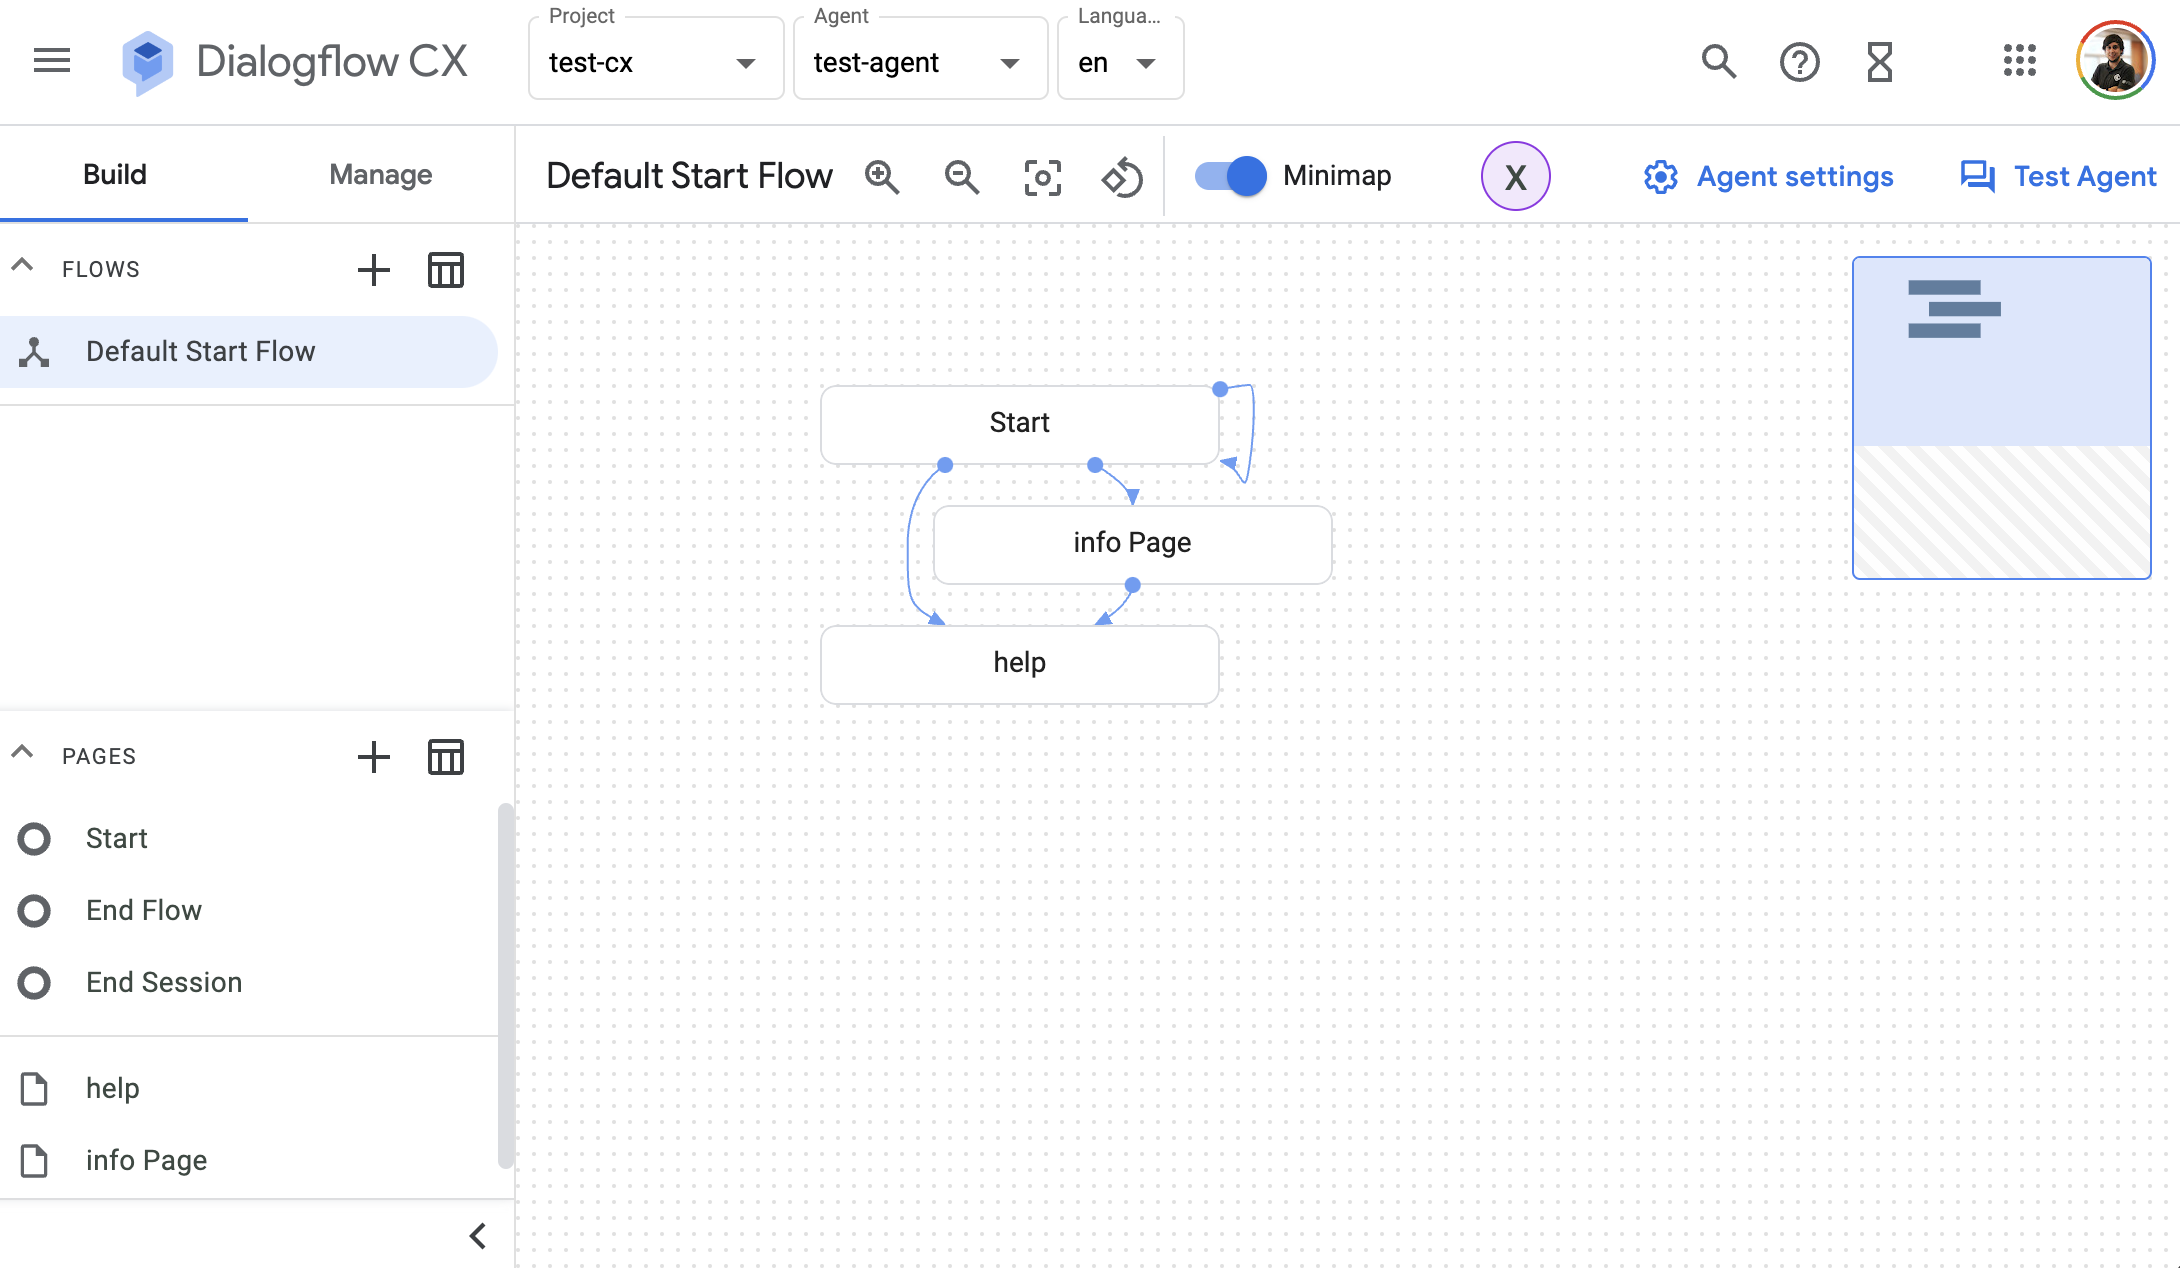 Dialogflow CX Agent
And that’s it, with these steps you have created your first Dialogflow CX agent. You only have to deploy your local changes. We are going to explain it in the next steps.
Project Files
These are the main files of the project:
├── cmd
│   └── main.go
├── function.go
├── go.mod
└── go.sum
cmd: The folder that contains all we need to spin up a local server for debugging.main.go: file that contains amain()method and runs a local server listening in port8080.
function.go: the Google Cloud Function main entry point.go.mod: this file is core to the Golang ecosystem and is a basic part of understanding and working with Golang.go.sum: this file lists down the checksum of direct and indirect dependency required along with the version
Google Cloud function in Golang
The Dialogflow CX SDK for Golang makes it easier for you to build highly engaging dialogflow CX conversations by allowing you to spend more time implementing features and less time writing boilerplate code.
You can find documentation, samples and helpful links in their official GitHub repository
The main Golang file in our Google Cloud Function project is function.go located in the root folder. This file contains all handlers.
The HandleWebhookRequest function is executed every time Dialogflow CX calls the webhook.
// HandleWebhookRequest handles WebhookRequest and sends the WebhookResponse.
func HandleWebhookRequest(w http.ResponseWriter, r *http.Request) {
	var request cx.WebhookRequest
	var response cx.WebhookResponse
	var err error

	// Read input JSON
	body, err := ioutil.ReadAll(r.Body)
	if err != nil {
		handleError(w, err)
		return
	}

	unmarshal := protojson.UnmarshalOptions{
		AllowPartial:   true,
		DiscardUnknown: true,
	}

	// Unmarshal from the protobuf struct
	if err = unmarshal.Unmarshal(body, &request); err != nil {
		handleError(w, err)
		return
	}

	log.Printf("Request: %+v", request)

	// Execute the response
	response, err = webhookResponse(request)

	if err != nil {
		handleError(w, err)
		return
	}
	log.Printf("Response: %+v", response)

	marshal := protojson.MarshalOptions{
		AllowPartial: true,
	}

	// Marshal from the protobuf struct
	bytes, err := marshal.Marshal(&response)
	if err != nil {
		handleError(w, err)
		return
	}

	// Send response
	if _, err = w.Write(bytes); err != nil {
		handleError(w, err)
		return
	}

}
It is important to notice here that to have a better development experience, we are using protobuf structs from the Dialogflow CX SDK. This is why we are marshaling and unmarshaling using the protojson library.
Deploying your Dialogflow CX Webhook
With the code ready to go, we need to deploy it on Google Cloud so it can be connected to the agent.
Before we continue, make sure that you have enabled the Cloud functions API enabled:
gcloud services enable cloudfunctions.googleapis.com
Now we can deploy our webhook with gcloud CLI on the root folder:
gcloud functions deploy my-agent-function --runtime go119 --trigger-http --entry-point HandleWebhookRequest
The public endpoint of this function is going to have this format:
https://<region>-<project-id>.cloudfunctions.net/<function-name>
So imagine that we have deployed this function in us-central1 and the project test-cx-346408, the URL will look like this:
https://us-central1-test-cx-346408.cloudfunctions.net/my-agent-function
Now the code is ready to be tested on the Console!
Dialogflow CX Console
Testing your Dialogflow CX Agent
Once you have deployed your changes, you can go to your Dialogflow CX Agent on the console and create a Webhook:
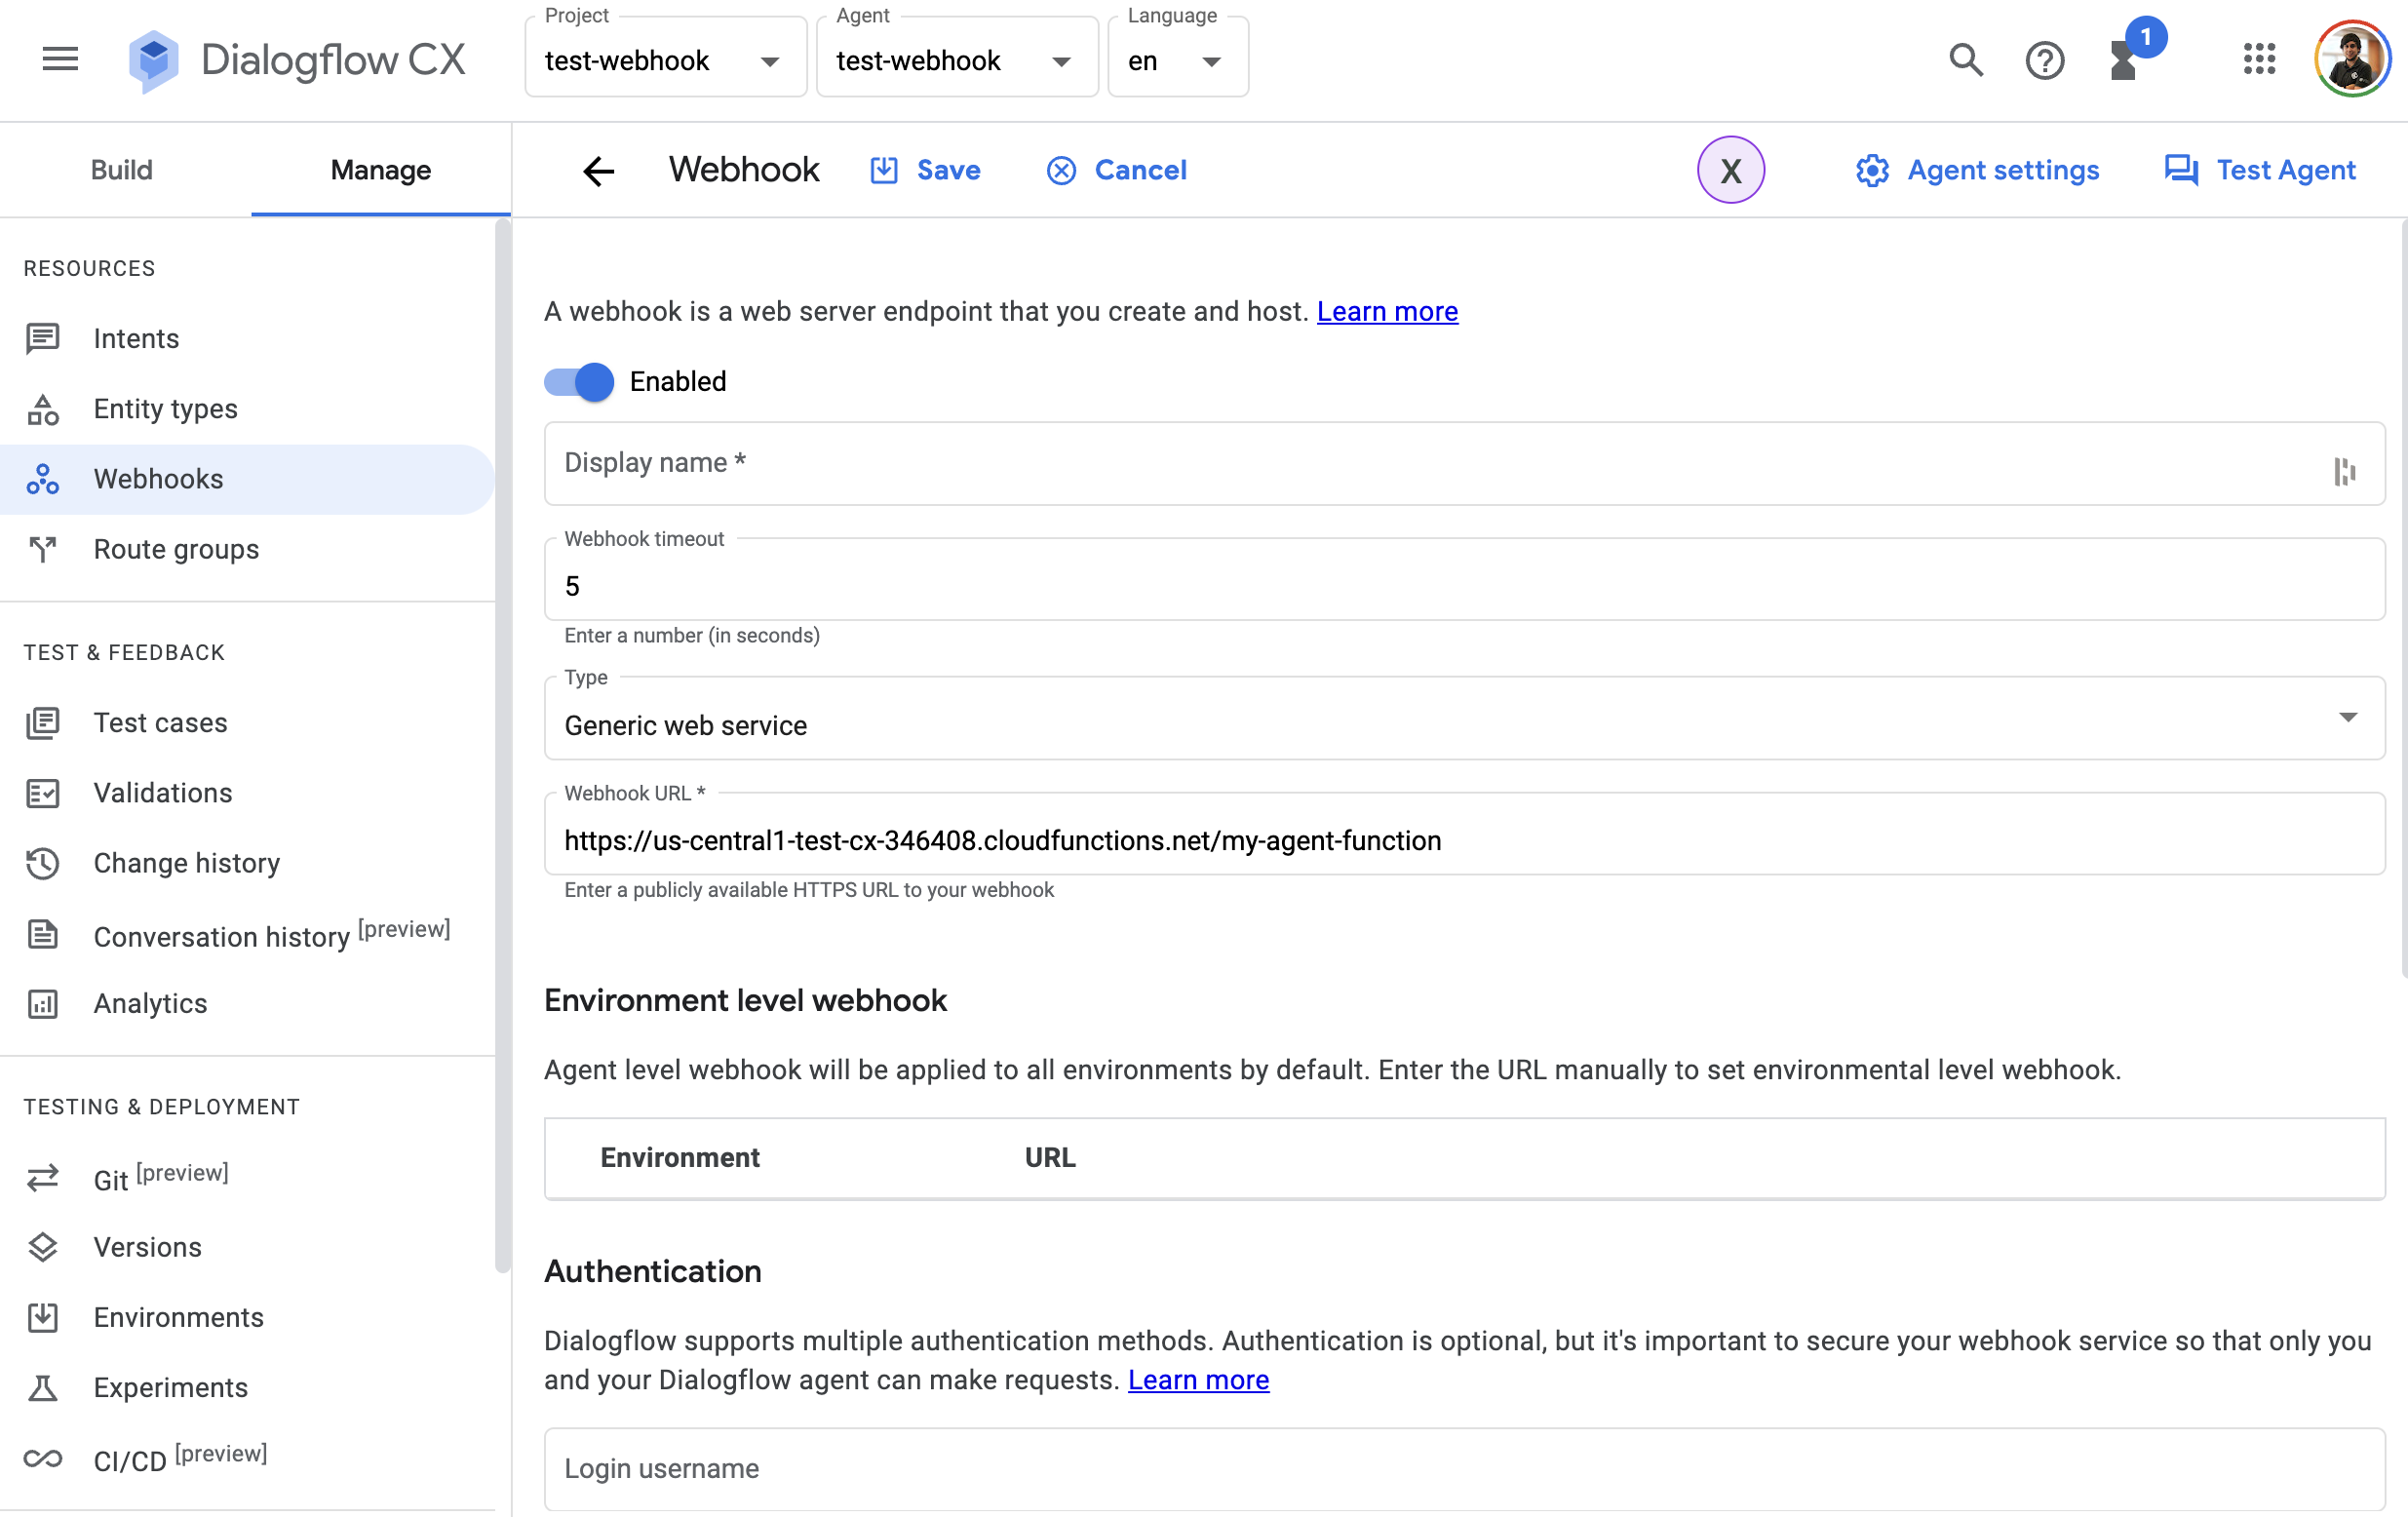 Dialogflow CX Webhook
Once you have added your webhook in your agent, you can go to any flow and set it wherever you need. Then you just need to test it in the simulator!
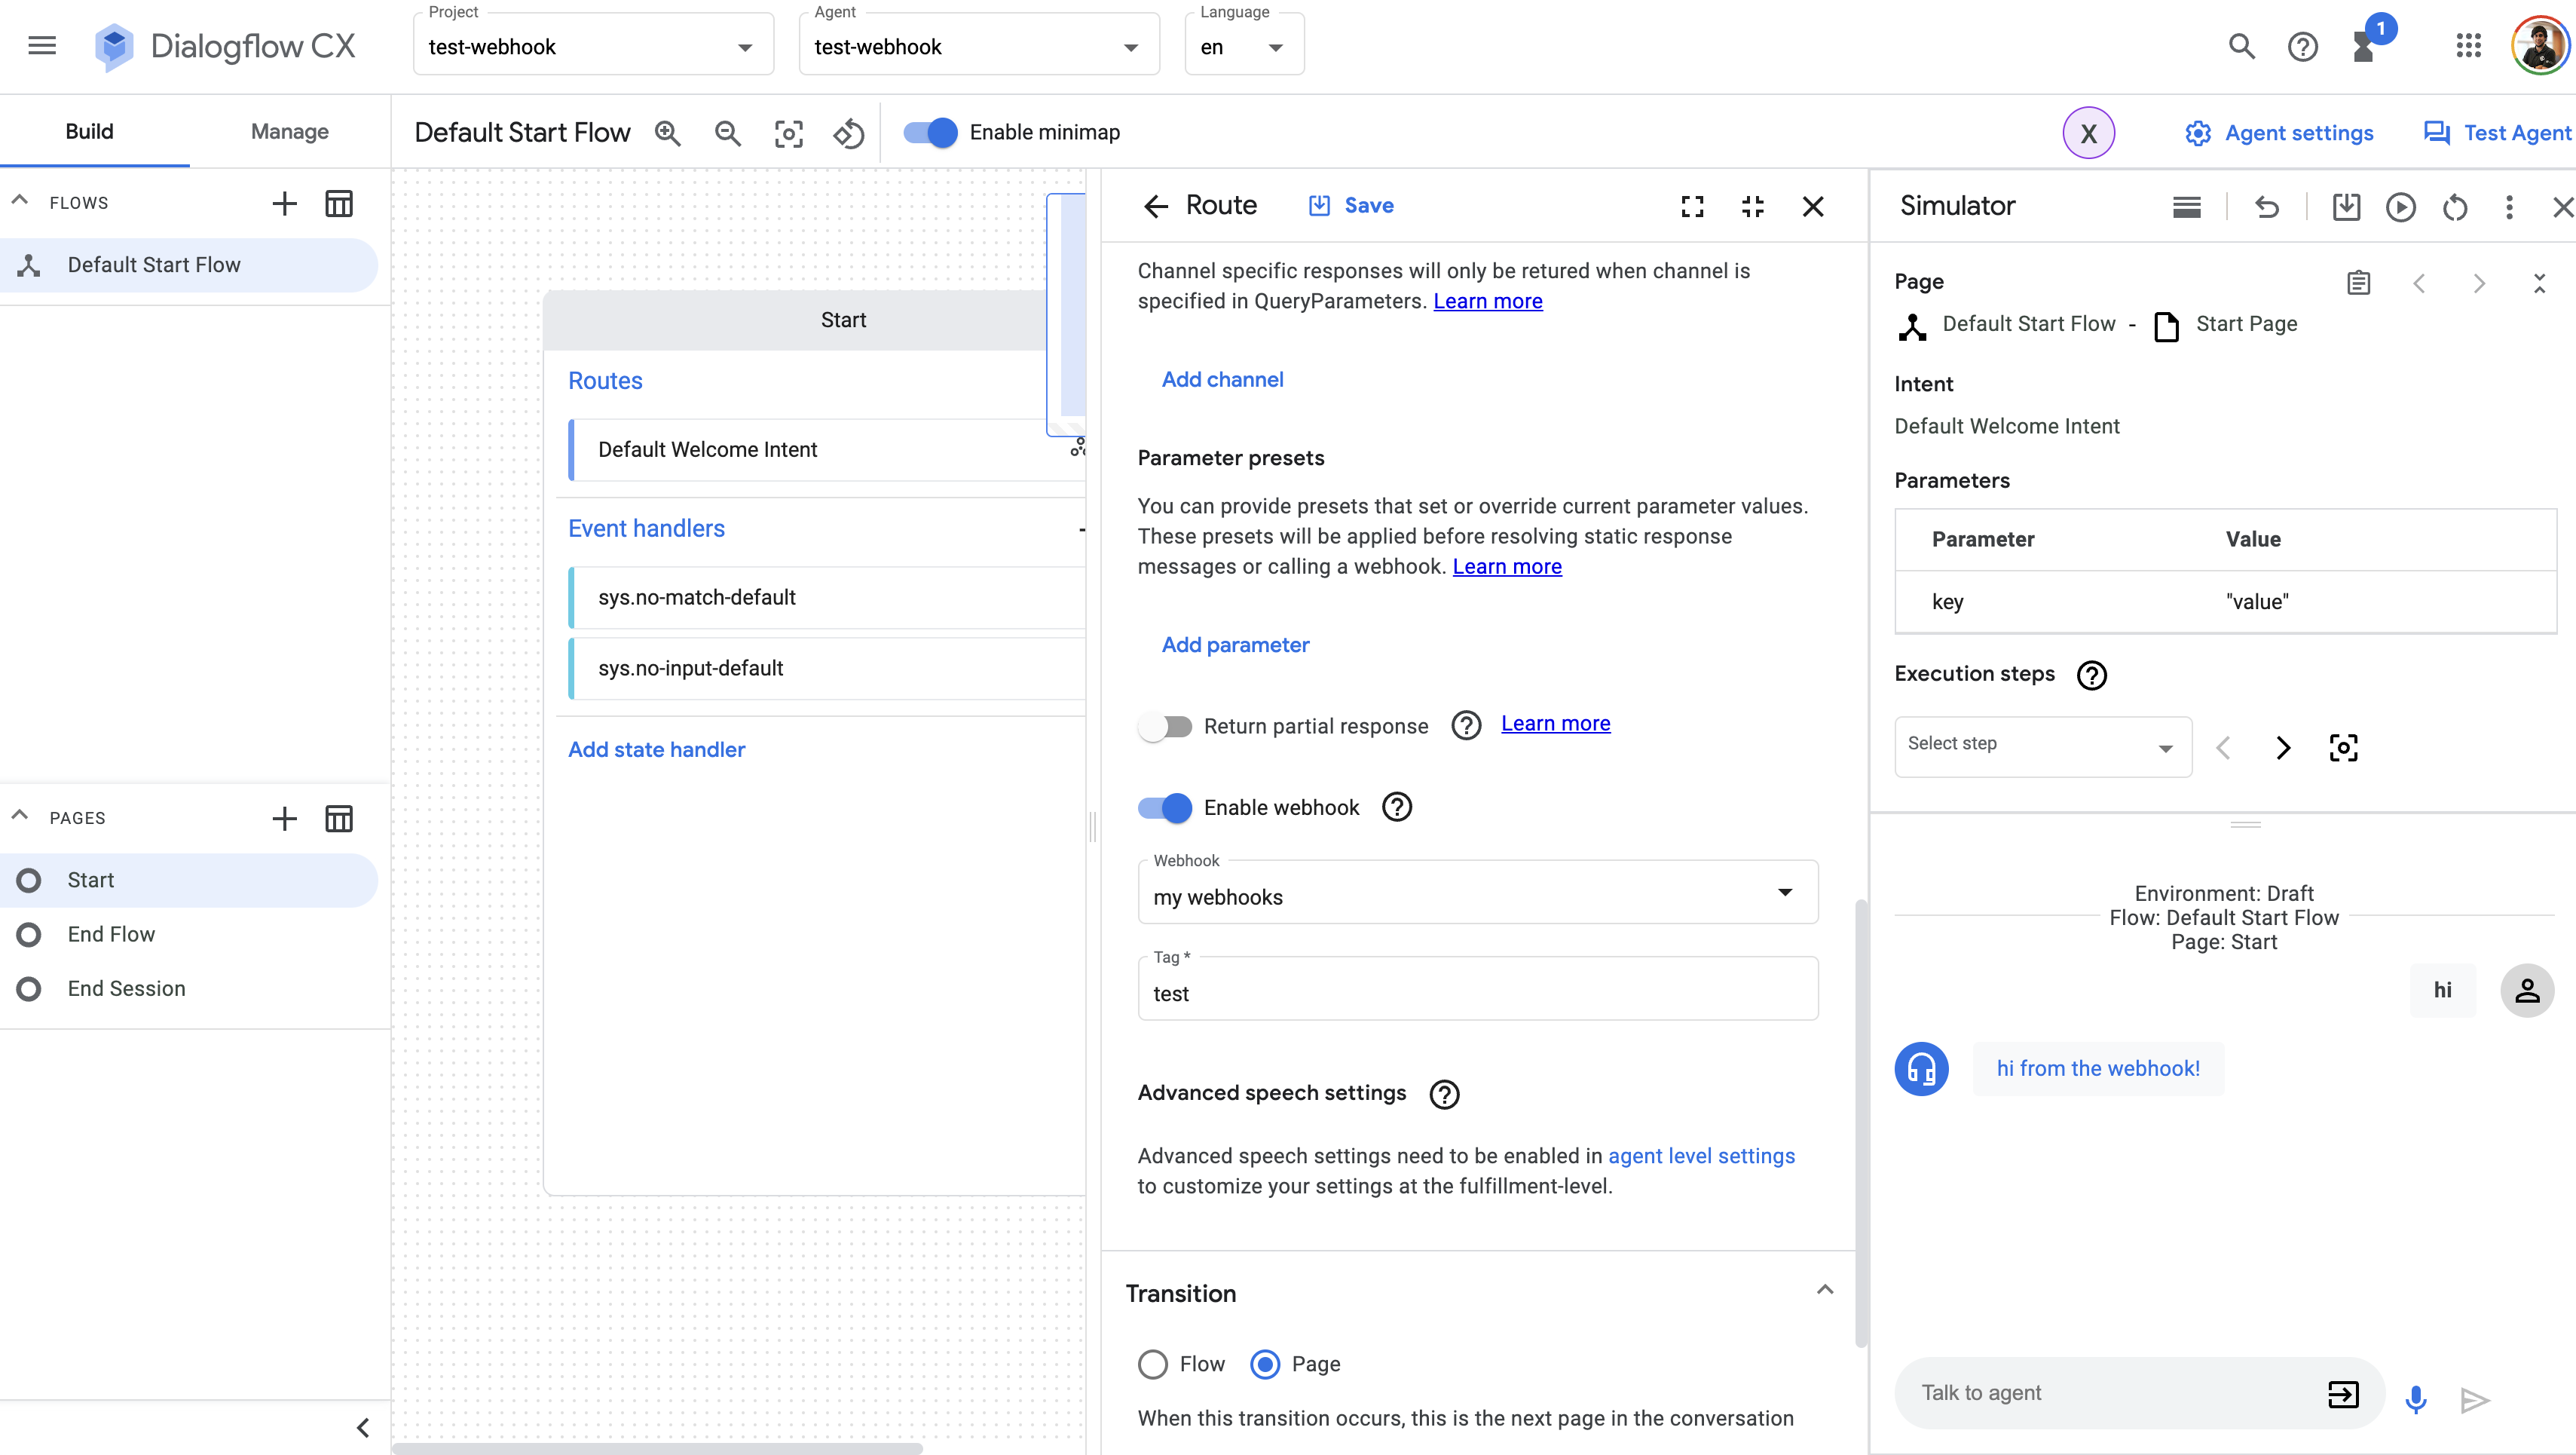 Testing in the console
Local
Building the Dialoglfow CX Webhook
Inside go.mod, we will almost always find metadata specific to the project. This metadata helps identify the project and acts as a baseline for users and contributors to get information about the project.
Here is how this file looks like:
module dialogflow.cx/cloudfunction

go 1.16

require (
	cloud.google.com/go/dialogflow v1.26.0
	google.golang.org/protobuf v1.28.1
)
For downloading our Webhook dependencies, we can run the following command:
go mod tidy
This command installs a package, and any packages that it depends on. If the package has a go.sum file, the installation of dependencies will be driven by that.
To build the webhook just run:
go build -o webhook .
Running the Dialogflow CX Webhook
The launch.json file in .vscode folder has the configuration for Visual Studio Code which allow us to run our lambda locally:
{
    "version": "0.2.0",
    "configurations": [
        {
            "name": "Run function",
            "type": "go",
            "request": "launch",
            "mode": "debug",
            "program": "${workspaceFolder}/cmd/main.go",
            "env": {
                "ENV": "development"
            }
        }
    ]
}
This configuration file will execute the following command:
dlv dap --listen=127.0.0.1:52462 --log-dest=3 from /Users/xavierportillaedo/Documents/personal/repos/dialogflow-cx-webhook-go/cmd
For a new incoming request a new server is running listening in port 8080. From the data received on the server the request body is extracted, parsed into JSON and passed to the webhook invoker’s serverless function handler. The response from the lambda serverless function is parsed as Dialogflow CX protobuf format as specified here The response is written onto the server and returned.
After configuring our launch.json file and understanding how the local debugger works, it is time to click on the play button:
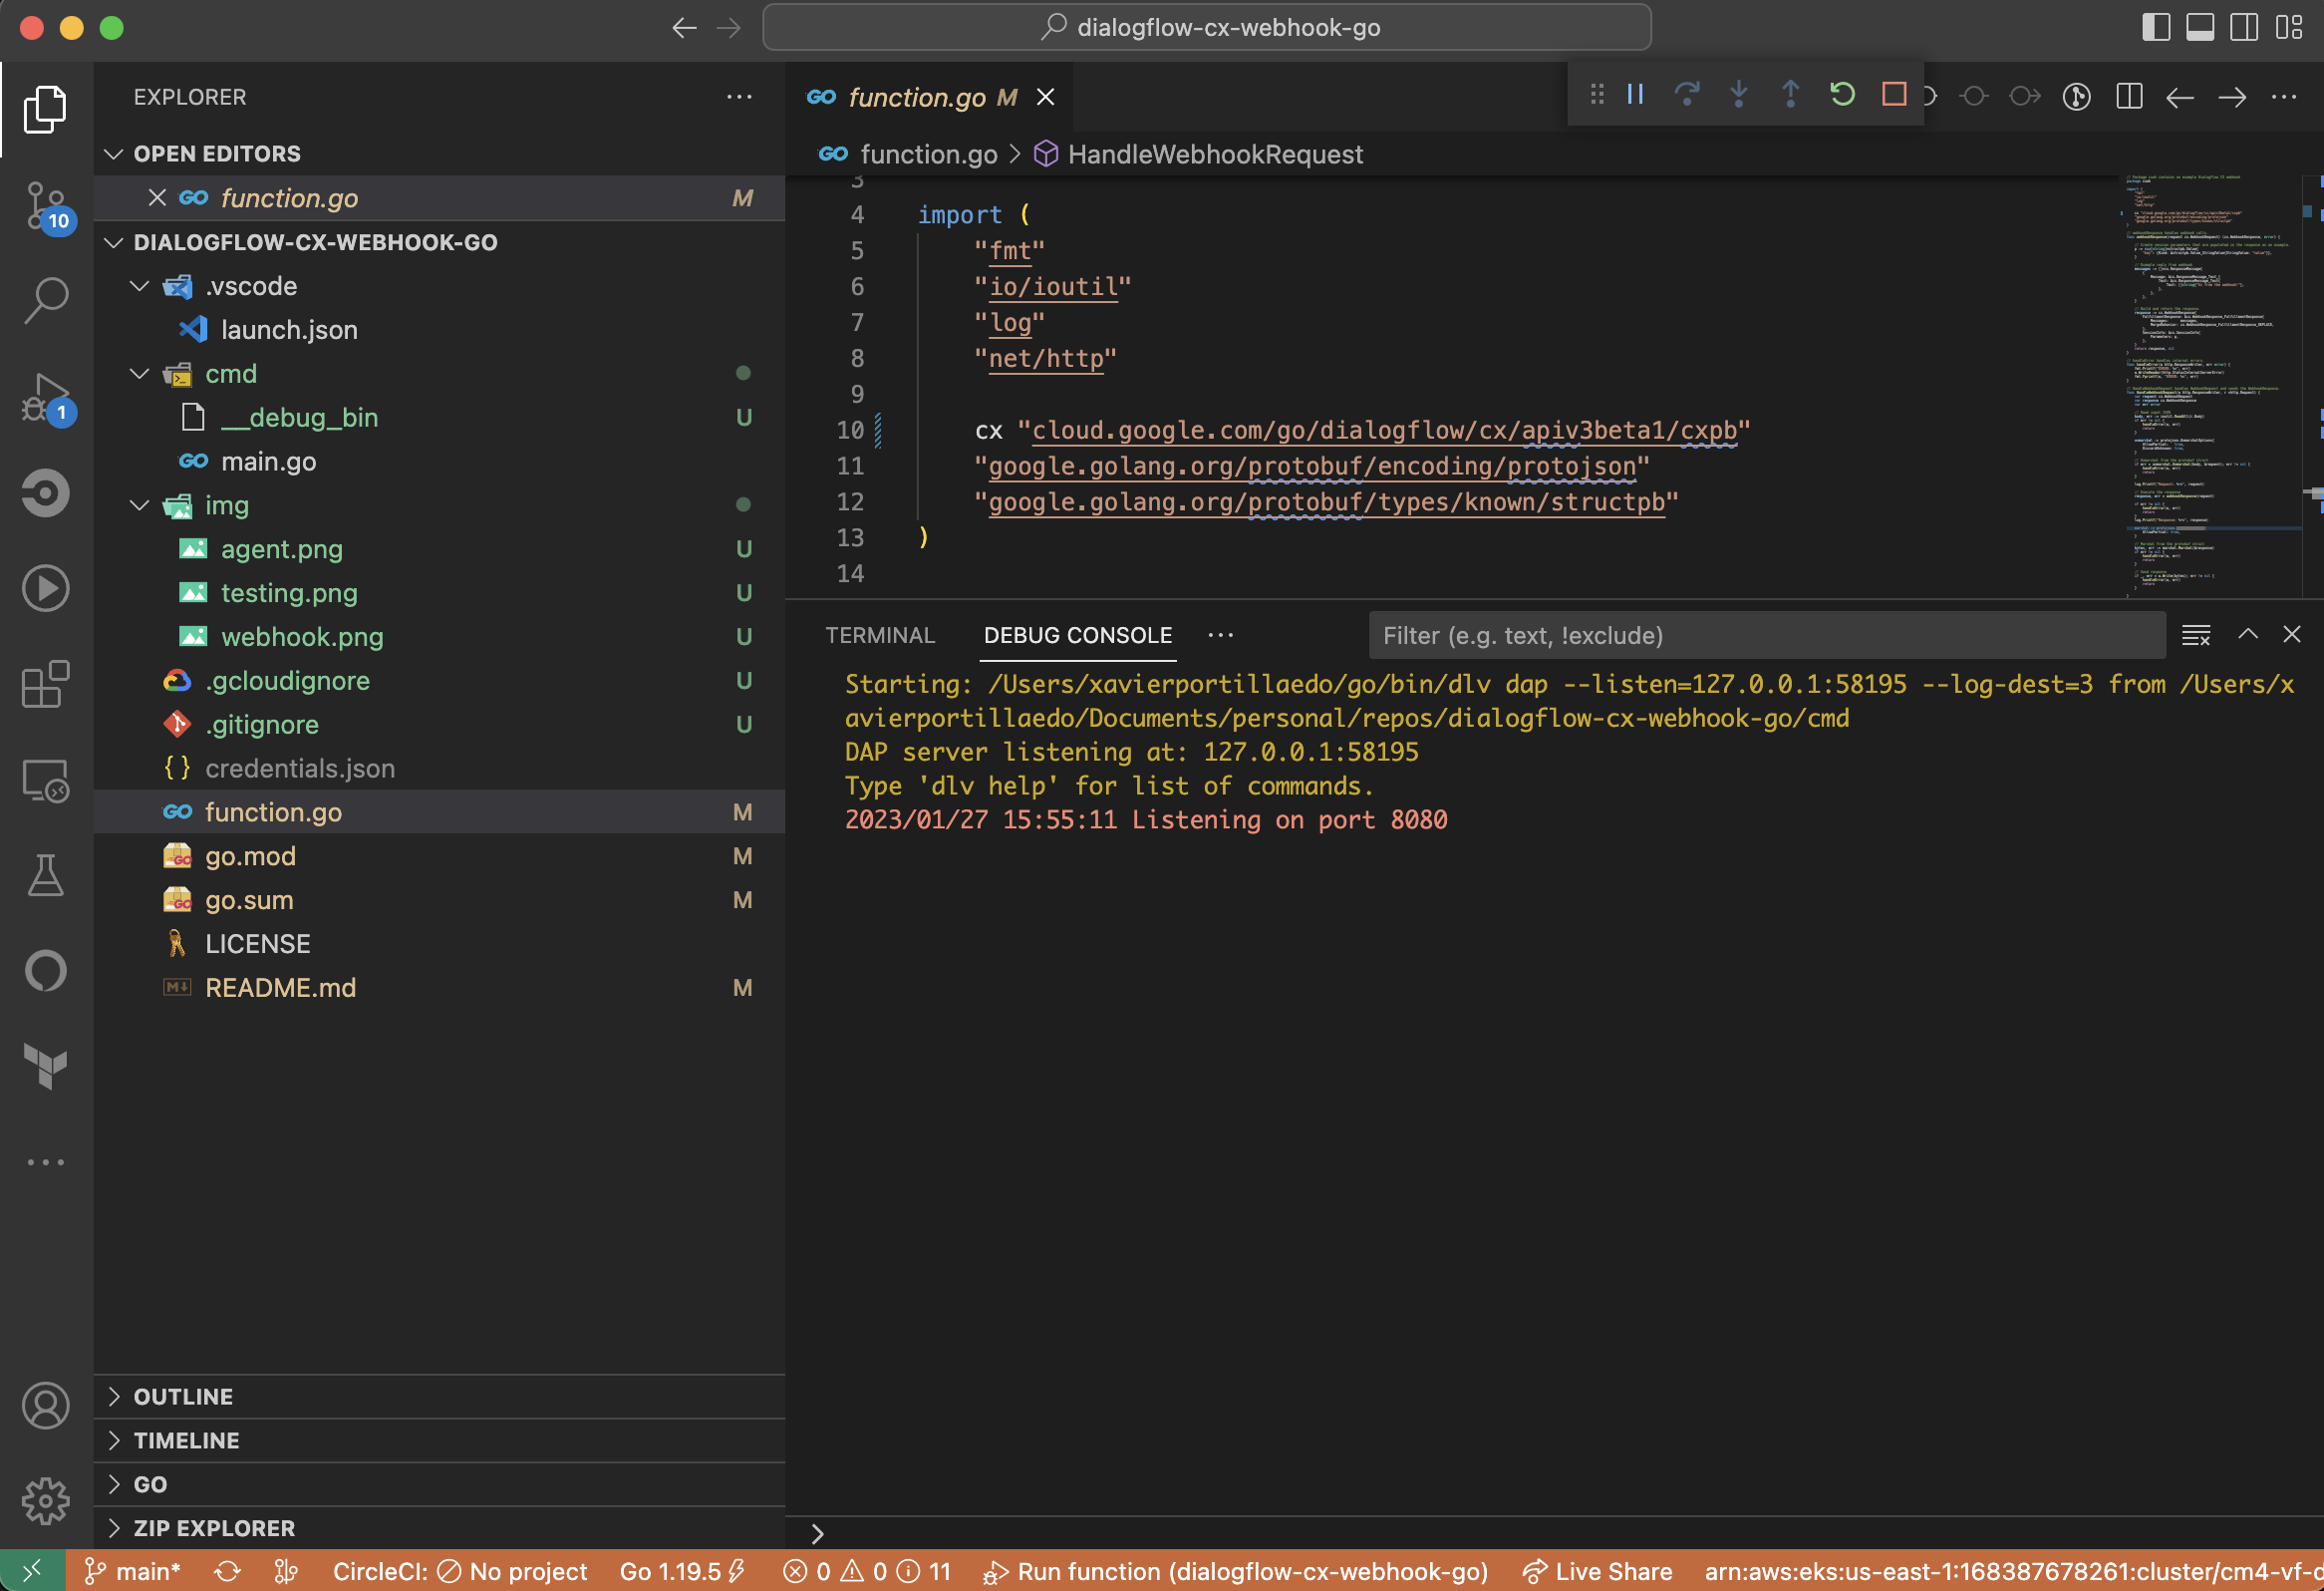 Webhook running
After executing it, you can send Dialogflow CX POST requests to http://localhost:8080.
Testing requests locally
I’m sure you already know the famous tool called Postman. REST APIs have become the new standard in providing a public and secure interface for your service. Though REST has become ubiquitous, it’s not always easy to test. Postman, makes it easier to test and manage HTTP REST APIs. Postman gives us multiple features to import, test and share APIs, which will help you and your team be more productive in the long run.
After running your application you will have an endpoint available at http://localhost:8080. With Postman you can emulate any Dialogflow CX Request.
For example, you can test this Request:
{
   "detectIntentResponseId":"dsfsdaf-c5c9-46ce-bf2c-935396c08926",
   "intentInfo":{
      "lastMatchedIntent":"projects/my-project-123/locations/us-central1/agents/sddadsa-576c-4bbb-bc27-34c276bfecd5/intents/00000000-0000-0000-0000-000000000000",
      "displayName":"Default Welcome Intent",
      "confidence":0.6684057
   },
   "pageInfo":{
      "currentPage":"projects/my-project-123/locations/us-central1/agents/sadasd-d5fc-4eb7-88fc-c25169027aee/flows/68f7790d-5c1f-4546-bb53-8d641f8288b4/pages/21939010-3336-450d-ae8b-0c9926aec791",
      "formInfo":{
         "parameterInfo":[
            {
               "displayName":"pokemon",
               "required":true,
               "state":"FILLED",
               "value":"pikachu"
            }
         ]
      }
   },
   "sessionInfo":{
      "session":"projects/my-project-123/locations/us-central1/agents/sadasd-d5fc-4eb7-88fc-c25169027aee/sessions/7fab78-aac-10e-989-d99313ca4",
      "parameters":{
         "pokemon":"pikachu"
      }
   },
   "fulfillmentInfo":{
      "tag":"test"
   },
   "text":"Hi!",
   "languageCode":"en"
}
The response from this example webhook is gonna be this one:
{
  "fulfillmentResponse": {
    "messages": [
      {
        "text": {
          "text": [
            "hi from the webhook!"
          ]
        }
      }
    ],
    "mergeBehavior": "REPLACE"
  },
  "sessionInfo": {
    "parameters": {
      "key": "value"
    }
  }
}
Debugging the Dialogflow CX webhook
Following the steps before, now you can set up breakpoints wherever you want inside all Golang files in order to debug your webhook:
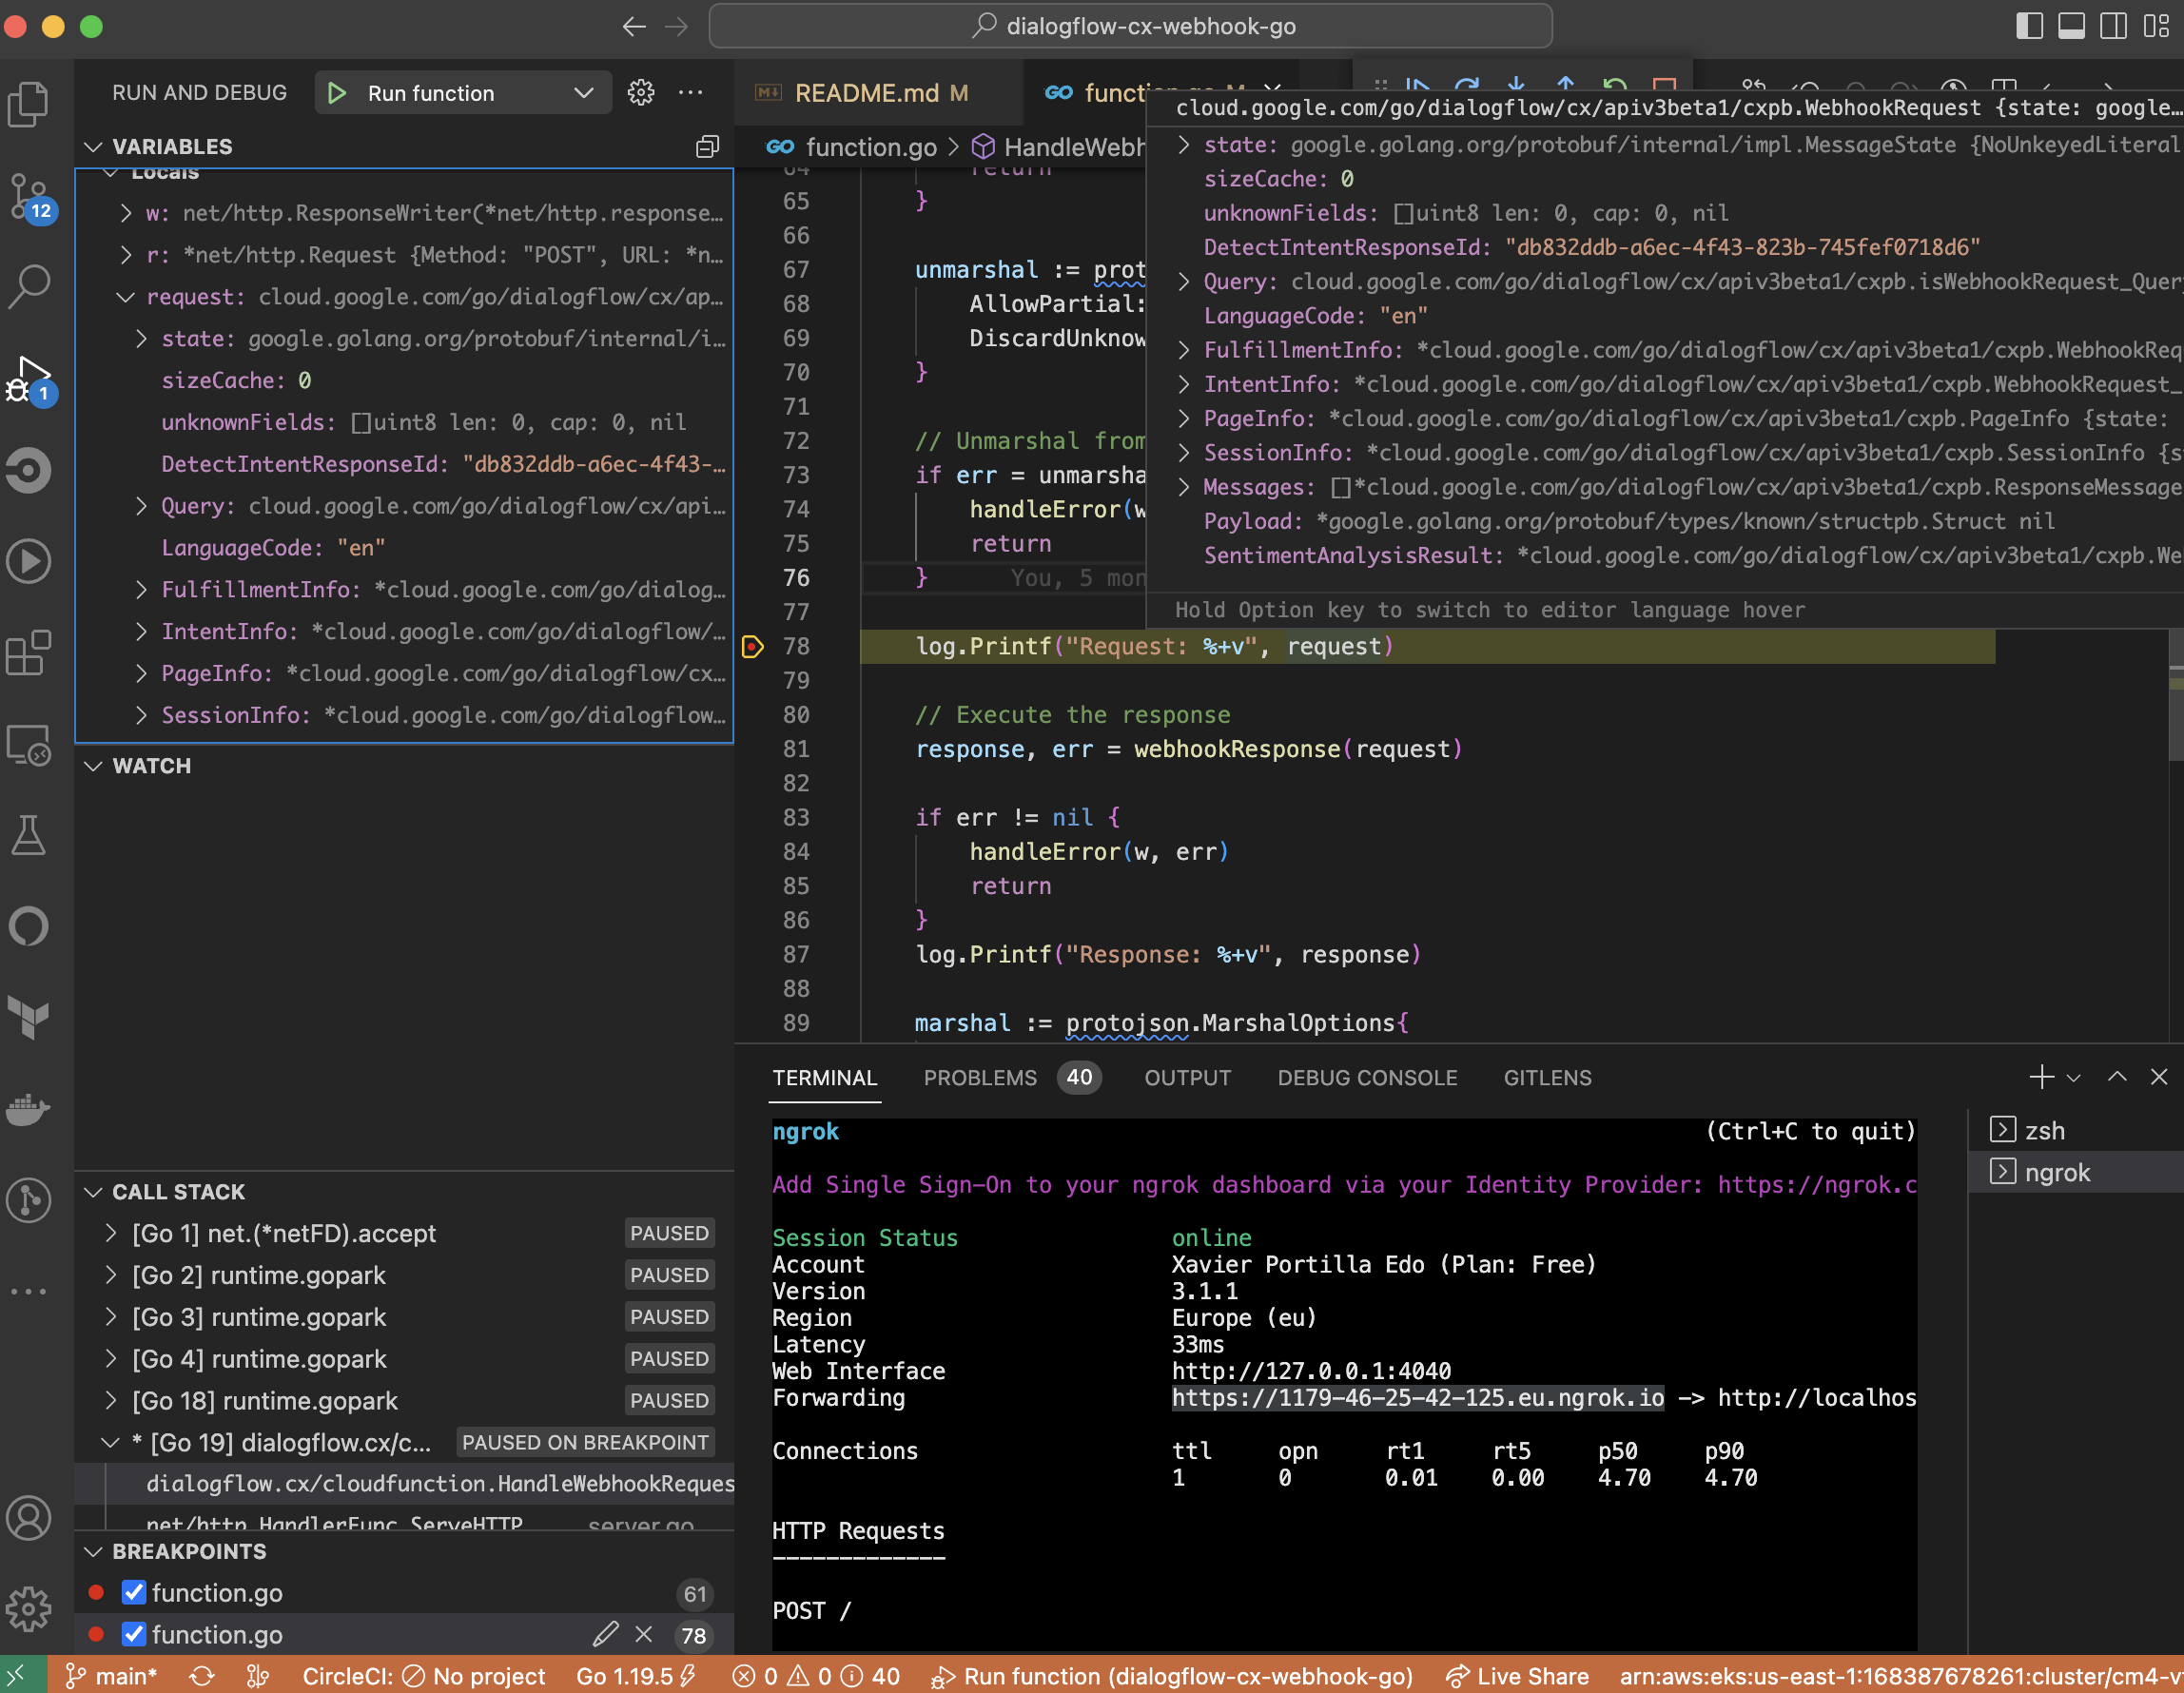 Webhook debugging
Hybrid
Port-forwarding requests directly from Dialogflow CX Console to your laptop
ngrok is a very cool, lightweight tool that creates a secure tunnel on your local machine along with a public URL you can use for browsing your local site or APIs.
When ngrok is running, it listens on the same port that you’re local web server is running on and proxies external requests to your local machine
From there, it’s a simple step to get it to listen to your web server. Say you’re running your local web server on port 8080. In a terminal, you’d type in: ngrok http 8080. This starts ngrok listening on port 8080 and creates the secure tunnel:
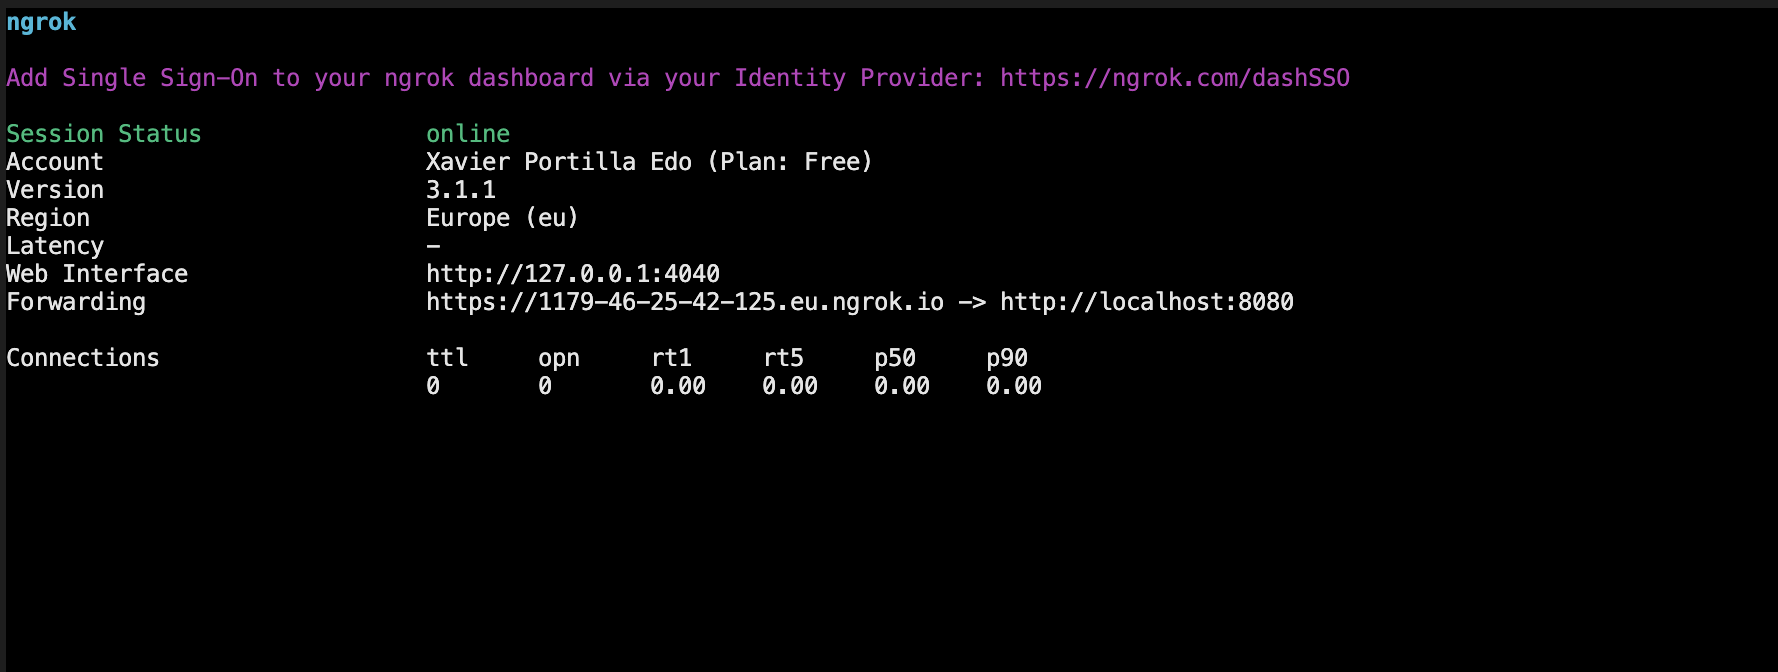 NGROK tunnel
So now you have to go to Dialogflow CX console, go to your Agent > webhooks and add the https url generated above. Eg: https://1179-46-25-42-125.eu.ngrok.io.
Go to the Simulator tab in the Dialogflow CX Console and launch your agent.
The Dialogflow CX Console will send an HTTPS request to the ngrok endpoint (https://1179-46-25-42-125.eu.ngrok.io) which will route it to your webhook running on Web API server at http://localhost:8080.
Resources
- Official Dialogflow CX Golang SDK - Official Dialogflow CX Golang SDK
- Official Dialogflow CX Documentation - Official Dialogflow CX Documentation
Conclusion
This was a basic tutorial to learn Dialogflow CX webhooks using Golang. As you have seen in this example, the Dialoglfow CX SDK for Golang and the Dialogflow CX Tools like gcloud and cxcli CLIs can help us a lot and also they give us the possibility to create Agents and conversations easily. This example was done using Golang, but you can use it as an inspiration for your webhooks that has been built using your favourite programming language.
I hope this example project is useful to you.
You can find the code here.
That’s all folks!
Happy coding!